LSMW Tools
LSMW stands for legacy system migration workbench and it is a special form of data migration that is used in SAP, to transfer data from legacy systems and to the SAP system. LSMW is ideal for master data, and does not require too much coding. Even a non-specialist in ABAP who is using the SAP system can easily use LSMW. That is why functional consultants rather than technical consultants use LSMW for data migration. LSMW may have the same functionality as a BDC program, but lacks in complexity and should only used for simple transactions. There are 14 steps in LSMW, here we describe each of the 14 steps.
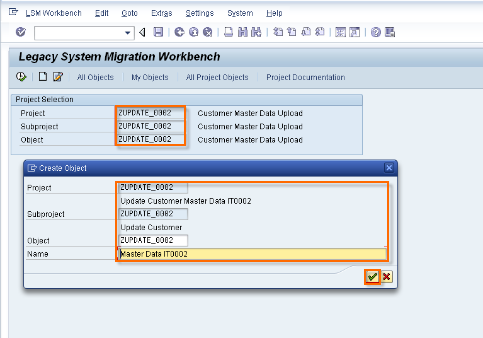
First, before carrying out the 14 LSMW steps, we create the project.
Creating Project/ Subproject and Object:
Step 1: – Enter the transaction code “LSMW” in command field and enter.
Step 2: – On the legacy system migration workbench screen, update the following fields.
- Project: – Update name of Project, you can update up to ten characters.
- Subproject: – Update the subproject ID
- Object: – Update the object ID that identifies the business object.
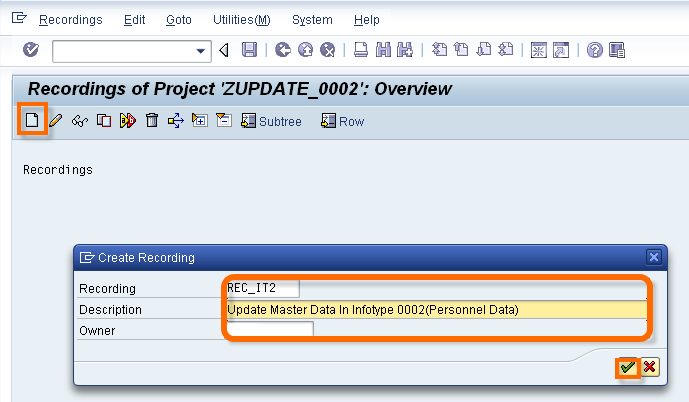
Step 2: – From the menu bar, select “Goto” and then click on “Recordings”. Next click on create icon and update recording name and its description.
Now Enter in transaction code ‘PA30’
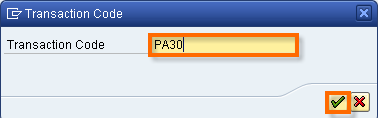
.> In the Master data maintain screen, enter Personnel No, infotype, subtype and click on “create”.
> Now Update fields start data, Name and additional data.
> Click on save button and save the data.
> In next screen, click on default all and save the data and come back

Now, we perform the 14 basic steps in LSMW.
Step 1: Maintain Object Attributes
> Locate object attributes on the radio button, click execute.
> Click Display/ Change. Enter the type of recording to be done while doing upload.
> Select ‘Batch Input Recording’ and give a recording name.
> Save and come back.
Step 2: Maintain Source Structures
> This is for building hierarchical relationships.
> Select source structure, click create
> Save and come back.
Step 3: Maintain Source Fields
> All the fields are assigned to be uploaded to the source structure.
> Go to, Object Overview, select table
> Go to change, select the source field and then Table.
> Copy the fields in excel – for now
> Save and come back.
Step 4: Maintain Structure Relations
> We check whether structure relations between legacy and R/3 are established or not.
> Don’t do anything here, just save and come back.
Step 5: Display Field Mapping and Conversion
> The relationship between legacy and R/3 based on object fields is established here.
> Go to extra, click on Auto Field Mapping.
> Upload the fields now.
Step 6: Maintain Fixed Values, Translations, User-Defined Routines
> Don’t do anything in this step.
Step 7: Specify Files
> Here, specify the location of the legacy file.
> Select legacy data from the folder in your computer.
> Double Click on Legacy Data and go to the Path,
> Save , come back
Step 8: Assign Files
> Check whether the file is assigned to source structure or not.
> Save and come back
Step 9: Read Data
> The legacy data is read here
Step 10: Display Read Data
> The data is displayed by giving line numbers.
Step 11: Convert Data
> The data is converted to SAP standards.
Step 12: Display Converted Data
> The converted data is viewed for cross checking
Step 13: Create Batch Input Session
> Batch input session is created
Step 14: Run Batch Input Session
> The batch input session is run
> Just Select Session and execute process
> The legacy data is now uploaded into the SAP system.
Successfully SAP Data is migrated by using LSMW.